
Chicken Handi

Spice Eats
Chef
“Sushanta and Bebonika are the husband-and-wife duo behind Spice Eats, a popular digital culinary brand. They are celebrated for providing high-quality, easy-to-follow Indian recipes with a focus on authentic flavors and techniques.”

Aarif
Food Journalist
Aarif is a devoted content writer at Regional Heritage Food (RHF), passionate about cooking and travel. He shares his culinary experiences and discoveries, inspiring others to explore new recipes and flavors.
Restaurant-Style Chicken Handi with Boneless Chicken, Yogurt, Cream and Aromatic Hand-Ground Spices
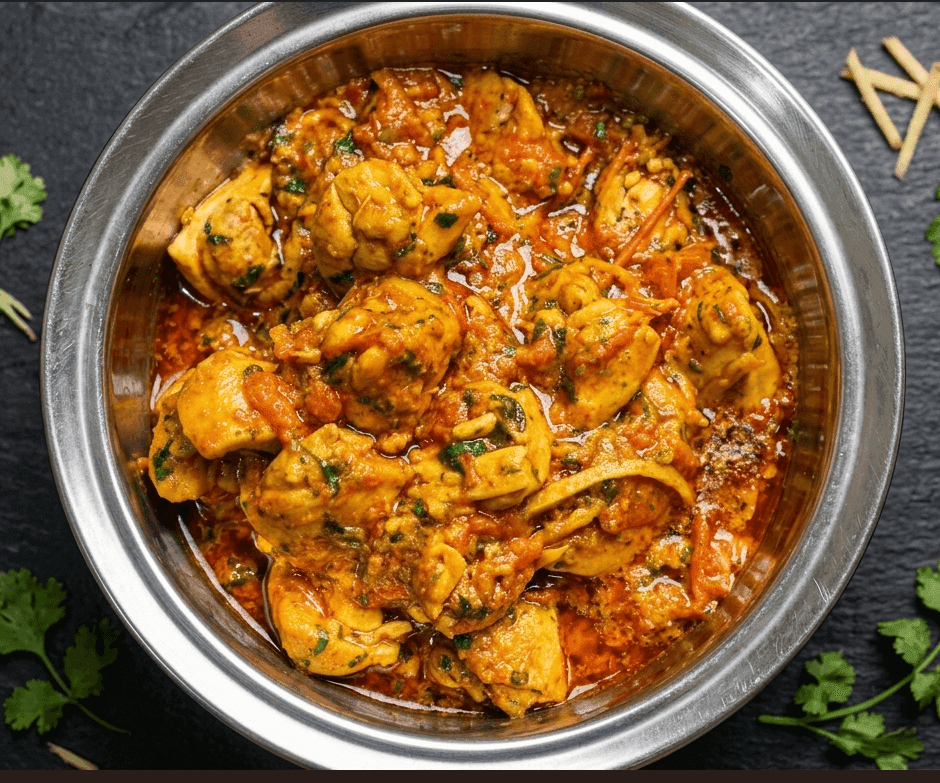
There is a reason Chicken Handi sits at the top of almost every Pakistani and North Indian restaurant menu. It is not just a dish. It is an assurance. The moment a table orders it, everyone around it knows what is coming: a deep, fragrant, gently spiced gravy built on onion and tomato, enriched with yogurt and fresh cream, poured over chicken that has been separately seared to lock in its juices and then slow-cooked until it is completely tender. The handi that arrives at the table is warm and glossy, scattered with green chilli and ginger julienne, fragrant with kasuri methi and garam masala, and built on a base masala that has been cooked with enough patience that the oil has separated and risen to the surface in a golden ring around the edge of the pot. That ring of oil is the visual promise that the dish was made correctly.
The handi itself is the origin of the name. It is a rounded clay pot, wide at the base and narrowing at the neck, traditionally used over wood fire or coal in dhaba kitchens across the subcontinent. The clay walls of the handi absorb heat slowly and release it evenly, creating a gentle, consistent cooking environment that no steel pot replicates exactly. The earthenware also carries a faint mineral quality that passes into the food over long cooking, giving dhaba handi its characteristic earthy depth. In cities and home kitchens where clay pots are not available, a heavy-bottomed steel pan or a non-stick kadai produces a very good result. The masala and the technique carry the flavour. The pot is the tradition.
Chicken Handi has its roots in the Mughlai cooking tradition of the Indian subcontinent, where rich, dairy-enriched meat dishes cooked in heavy clay vessels were the centrepiece of court cuisine. As Mughlai cooking spread from the royal kitchens of Delhi and Agra into the dhabas and street restaurants of Punjab, Sindh, and the entire northern belt, handi dishes became the bridge between grand occasion food and everyday eating. They were rich enough to feel special but practical enough to cook in volume. Today, from Lahore to Karachi, from Rawalpindi to Delhi, Chicken Handi is the dish that defines what a good restaurant meal looks and tastes like. No menu is complete without it.
Why This Recipe Works Better Than Others
The Chicken Is Seared Separately Before Going into the Masala
Most home recipes skip this step and add raw chicken directly to the onion tomato base. Spice Eats fries the chicken cubes first in ginger garlic paste with a little salt on medium to high heat for three to four minutes before anything else happens. This separate sear does several things. It creates a light crust on the outside of each piece that helps it hold its shape during the longer simmer in the masala. It develops surface colour and a roasted flavour that raw chicken added to a sauce never achieves. And it gives the ginger garlic paste a short frying time to lose its raw edge before the onions and tomatoes enter the picture. The result is chicken that contributes its own flavour to the gravy rather than passively absorbing the masala from the outside.
Yogurt Is Added After the Heat Is Switched Off, Then Cooked Back Up Slowly
This is the single most important technical step in the recipe and the one most home cooks get wrong. Adding yogurt to a hot pan causes it to curdle immediately, splitting into grainy solids and thin liquid. Spice Eats switches the heat off completely before the yogurt goes in, stirs it through the masala until it is fully incorporated, and then turns the heat back on low. Cooking on low heat for two minutes after this allows the yogurt to bond with the masala without curdling. The result is a smooth, creamy, unified gravy rather than a broken, grainy one. This one step is the difference between a restaurant-quality texture and a home-kitchen disappointment.
The Masala Is Cooked to Oil Separation at Every Stage
This recipe cooks the masala to oil separation three times: after the tomatoes, after adding back the chicken, and after the yogurt. Oil separation is not a sign that the dish is greasy. It is the visual confirmation that the water content of each wet ingredient has been fully cooked off and that the spices have had enough time and heat to cook through and bind to the fat. A masala that has not separated is a masala where the tomatoes, yogurt, or cream are still partially raw. Spice Eats is explicit about checking for separation at each stage, and this discipline is what gives the finished handi its deep, unified flavour rather than the fragmented taste of a quickly assembled curry.
Green Chilli, Ginger Julienne, and Cream Go in Together at the Very End
The finishing stage in this recipe is carefully sequenced. After the chicken is tender and the masala has tightened, the green chilli pieces and ginger julienne go in first, giving them thirty seconds to release their fresh heat into the hot gravy without fully cooking. Then the fresh cream follows. The cream is not stirred in aggressively. It is added to a dish that is already at the right flavour balance, and it simply enriches and smooths the surface without dominating. The ginger and chilli stay vibrant against the creamier base, providing the brightness and contrast that is the defining characteristic of a well-made restaurant handi. Everything added at the start would be invisible by the end.
Kasuri Methi Is Dry-Roasted and Powdered Before Use
Most recipes call for kasuri methi to be crushed between the palms and added. Spice Eats takes one extra step: the dried fenugreek leaves are dry-roasted in a separate pan and then powdered before going into the dish. Dry-roasting intensifies the earthy, slightly bitter fragrance of the kasuri methi significantly compared with using it straight from the packet. Powdering it means the flavour distributes evenly through the gravy rather than sitting in visible clumps. This is a small step that takes two minutes and produces a noticeably more aromatic finished dish.
Prep time
15 min
cook time
30 min
Servings
3
Ingredients
- Boneless chicken500 g
cut into one-inch cubes
- Oil2 tbsp
- Ginger garlic paste2 tbsp
- Salt1 tsp
- Onion100 g
1 large, finely chopped
Method
Prepare All Ingredients Before the Pan Goes On
Prepare everything before the flame is lit.
Wash, dry, and cube the chicken. Finely chop the onion, keeping the pieces as small and even as possible because large uneven onion pieces create a textured rather than smooth masala base. Roughly chop the tomatoes. Cut the green chillies into large pieces, not finely, because they need to stay visible and textural in the finished dish. Julienne the ginger, keeping the strips long and thin. Chop the coriander. Whisk the yogurt until it is completely smooth with no lumps. Measure all spices into a small bowl.
Before anything goes on the stove, dry-roast the kasuri methi.
Place a small dry pan over low heat, add the dried fenugreek leaves, and toast them for about ninety seconds, moving them continuously. They will darken slightly and release a warm, nutty, herbal fragrance.
Remove from heat immediately and grind to a fine powder using a spice grinder or mortar and pestle. Set aside.
This takes two minutes and changes the character of the kasuri methi significantly.
Chef's Tip:
The finer the onion is chopped, the smoother the finished masala will be. If you want an even smoother result, you can pulse the fried onion and tomato mixture in a blender for ten seconds before adding the chicken back. This is closer to how restaurants produce the uniformly silky gravy that distinguishes their handi from a home-cooked curry.
Fry the Chicken Separately First
Heat two tablespoons of oil in a wide flat pan over low heat.
Add the ginger garlic paste and fry for exactly one minute on low heat, stirring continuously.
The paste should turn slightly golden and lose its raw, sharp smell. Do not fry it on high heat at this stage or it will burn before the chicken is added.
Add the chicken cubes and the one teaspoon of salt.
Increase the heat to medium-high. Fry the chicken on medium to high heat for three to four minutes, turning the pieces regularly.
The goal is to get some colour on the outside of each cube without cooking the chicken through. The surface should turn from pale to lightly golden on most sides.
The chicken will release some moisture, which is fine. Continue frying until the moisture has reduced and the chicken is beginning to colour properly. Remove the chicken from the pan with a slotted spoon and set it aside on a plate. Leave the oil and any residue in the pan.
Chef's Tip:
Do not crowd the pan when frying the chicken. If all 500 grams go in at once in a small pan, the pieces steam against each other rather than frying individually. If your pan is small, fry the chicken in two batches. A properly seared individual cube contributes much more flavour to the masala than a crowded, steamed batch does.
Build the Onion and Tomato Masala
In the same pan with the residual oil and ginger garlic residue from the chicken, add two more tablespoons of oil over medium heat.
Add the cumin seeds and let them sizzle for twenty to thirty seconds until they release their fragrance and begin to darken slightly.
Add the finely chopped onions. Fry on medium heat for five to six minutes, stirring regularly, until the onions are light brown.
Light brown, not golden and not dark. Light brown means the onions have lost most of their moisture and developed a sweet, slightly caramelised base without going bitter.
Add the chopped tomatoes and a quarter teaspoon of salt. Cook on medium heat for three to four minutes, pressing the tomatoes against the pan with the back of a spoon to help them break down.
When the tomatoes have softened and begun to collapse, add the turmeric, red chilli powder, and coriander powder together.
Stir the spices through the tomato and onion base and add a small splash of water, about two tablespoons, to prevent the spices from sticking and burning.
Continue cooking on medium to low heat for about three minutes, stirring regularly, until the oil separates from the masala and appears around the edges of the mixture.
This separation is the key checkpoint before the chicken goes back in.
Chef's Tip:
The splash of water added with the spices is not there to make the masala wet. It is there to give the spices thirty seconds to bloom in moisture and cook through before the liquid evaporates. Adding dry ground spices to a dry hot pan causes them to burn on the surface before they have a chance to cook properly. The water prevents this. Add just enough to coat the spices and let it cook off before moving forward.
Add the Chicken Back and Cook Until Dry
Add the seared chicken cubes back to the masala. Stir everything together so each piece is fully coated in the onion tomato base.
Increase the heat to medium. Fry the chicken in the masala for five minutes, stirring regularly.
During this time the chicken will release more moisture and the pan will become wetter before it dries again.
Continue cooking until the water has dried up completely and the oil has separated again, appearing as a thin sheen around the masala and the chicken.
The masala should be clinging tightly to each piece of chicken with no visible liquid in the pan.
Chef's Tip:
The five minute frying time at this stage is where the chicken picks up the masala flavour most actively. Rushing this stage and moving to the yogurt while there is still liquid in the pan produces a thin, slightly watery gravy rather than the thick, clinging masala that defines a proper handi. Wait until you can clearly see the oil separating before moving on.
Add Yogurt Off the Heat, Then Cook Back Up Slowly
This is the most critical step in the entire recipe. Switch the heat off completely. Allow the pan to sit off the flame for about thirty seconds so the very surface temperature drops slightly.
Now add the two tablespoons of whisked yogurt and stir it through the masala and chicken thoroughly. Make sure no streaks of white yogurt remain visible.
The yogurt must be fully incorporated into the masala while the pan is off heat.
Once the yogurt is fully mixed in, return the pan to low heat. Cook on low heat for two minutes, stirring gently, until the oil separates again.
You will see the masala tighten and the yogurt become part of the base rather than sitting on top of it.
This is what a properly incorporated yogurt looks like in a handi: not white and visible, but absorbed, enriching the colour and body of the masala.
Chef's Tip:
Cold yogurt added to a hot pan will curdle regardless of the heat level. Take the yogurt out of the refrigerator at least thirty minutes before you need it so it reaches room temperature. Room temperature whisked yogurt incorporated off-heat gives a completely smooth result. Cold yogurt from the fridge will still curdle even with the heat turned off because the temperature difference is too extreme.
Add Water and Cook the Chicken to Full Tenderness
Add 50 millilitres of water to the pan. Stir through and mix well. Cover the pan with a lid and cook on low heat for ten minutes.
During this time the chicken finishes cooking through to the centre, the masala further thickens and deepens, and the flavours consolidate into a unified gravy.
Check the pan at the five minute mark and stir to make sure nothing is sticking to the bottom.
After ten minutes, lift the lid and check that the chicken is completely tender when pressed with a spoon. The masala will have thickened significantly and the oil will be separating visibly again.
Chef's Tip:
The ten minute covered cook on low heat is where the magic of the handi happens. The steam trapped inside the pan circulates and cooks the chicken from every direction simultaneously. Low heat during this stage is essential. Medium or high heat will boil the masala rather than simmer it, and boiling causes the yogurt base to break and the gravy to go thin and slightly grainy. Keep the heat genuinely low and trust the covered ten minutes to finish the chicken
Add the Finishing Spices, Cream, Garnish and Serve
Add the crushed black pepper, garam masala powder, and the roasted and powdered kasuri methi to the pan.
Stir through and cook for two to three minutes on medium heat, uncovered. The masala will tighten further and take on the warm, herbal aroma of the kasuri methi.
Now add the green chilli pieces and the ginger julienne. Give everything a gentle mix and let the chilli and ginger sit in the hot masala for thirty seconds.
Then add the fresh cream. If the consistency looks thicker than you want, add two to three tablespoons of water at this stage.
Stir the cream through gently and simmer for two to three minutes on low heat until the oil separates one final time and the cream has been fully absorbed into the gravy.
Scatter the chopped coriander leaves over the top and serve immediately from the pan or transfer to a warmed serving handi.
Chef's Tip:
Serve the handi in a clay pot or a thick steel serving bowl that has been warmed in hot water, dried, and placed on the table. A warm serving vessel keeps the handi at the right temperature throughout the meal without the gravy cooling and thickening on the surface. A cold plate will cause the cream and masala to set within minutes of leaving the stove, which affects both the texture and the appearance of the dish when it reaches the table.
How to Get Restaurant-Quality Chicken Handi at Home
The gap between a restaurant Chicken Handi and a home-cooked one almost always comes down to two things. The first is patience with the masala. Restaurant kitchens do not rush the onion, tomato, or post-yogurt stages. They cook each one until the oil has properly separated before moving to the next. This takes time and the result is a masala that tastes completely cooked and unified rather than raw and layered in the wrong way.
The second is the cream and finishing sequence. Home cooks often add cream too early or skip the green chilli and ginger julienne because they seem like optional garnish. They are not. The green chilli and ginger added in the final stage provide the fresh, sharp contrast that makes the rich, creamy base taste alive rather than heavy. Without them the handi is good. With them it is the restaurant dish you remember.
Cook the masala slowly. Finish boldly. These two habits will close most of the distance between the home kitchen and the restaurant.
Nutritions
Per serving (~200g of chicken handi with gravy)
People Also Ask
Yes. Bone-in curry-cut chicken pieces produce a richer, more flavourful handi because the bone marrow releases into the gravy during the slow cook. The cooking time needs to be extended. After adding the water in Step 6, cook covered for twenty to twenty-five minutes rather than ten, checking at fifteen minutes and adding a splash more water if the masala is drying before the chicken is fully cooked through. The finished dish will have more body in the gravy and a deeper flavour, but the texture is coarser than the smooth boneless version.
Yes. Thick coconut milk works very well and takes the handi in a slightly South Indian direction, particularly if you have used curry leaves anywhere in the recipe. Cashew cream made from blended soaked cashews and water is another excellent substitute and adds a mild nuttiness without any coconut flavour. Use the same quantity as the fresh cream in either case. Avoid thin or light coconut milk because it will not add the body that the cream provides and the gravy will be thinner than it should be.
The most common cause is undercooked masala at one or more stages. If the onions were not cooked to light brown, if the tomatoes went in before the onions were ready, if the spices were added to a wet base rather than a dry one, or if the yogurt stage was rushed, the finished dish will taste like its components rather than a unified gravy. The fix is almost always more time at each stage, not more spices. Cook each stage until the oil separates before moving on, regardless of how long it takes. That visual checkpoint is the recipe working correctly.
Yes, and it actually improves with resting time. Make the handi up to the end of Step 6, which is after the chicken is fully tender and before the finishing spices and cream are added. Refrigerate at this stage. When ready to serve, reheat the handi gently on low heat with a splash of water to loosen, then proceed with Step 7: add the black pepper, garam masala, kasuri methi, green chilli, ginger, and cream fresh at serving time. The cream and fresh garnishes are always added at the last moment, never stored with the dish, to keep their texture and fragrance intact.