
Lobia Masala

Kunal Kapur
Chef
“Chef Kunal Kapur is a celebrated Indian celebrity chef, restaurateur, and television personality known for MasterChef India. He champions modern Indian cuisine while honoring traditional flavors and techniques.”
Aarif
Food Journalist
Aarif is a devoted content writer at Regional Heritage Food (RHF), passionate about cooking and travel. He shares his culinary experiences and discoveries, inspiring others to explore new recipes and flavors.
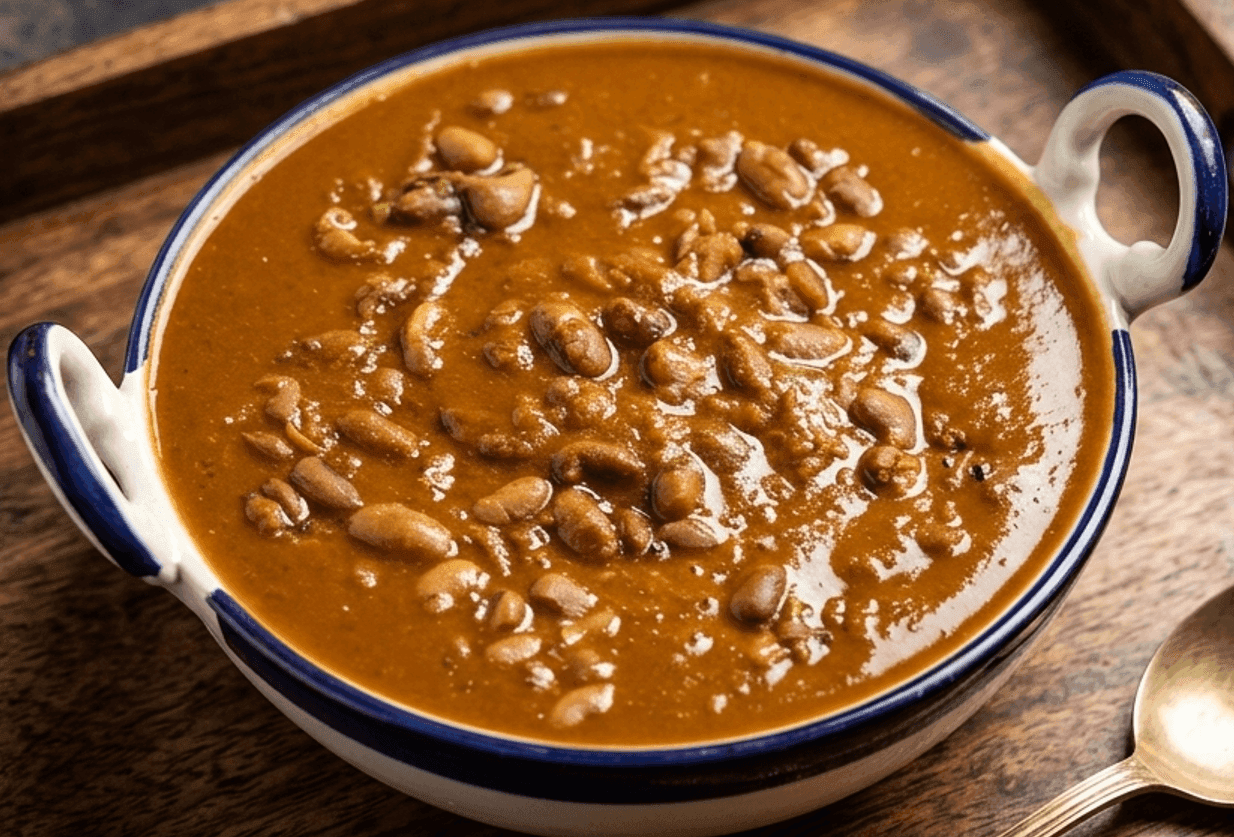
Red kidney beans soaked overnight and slow-cooked in a rich onion tomato masala layered with aromatic traditional spices.
Red lobia, known across the subcontinent as kidney bean, has been a staple of North Indian and Pakistani cooking for centuries. The bean itself originated in the Americas and came to the subcontinent through Portuguese and Spanish trade routes in the sixteenth and seventeenth centuries. It was adopted so completely into Punjabi cooking that within a generation or two it became impossible to imagine the cuisine without it. Punjab in particular made red lobia its own, developing a cooking tradition around the chitra variety, a speckled lighter-coloured bean that cooks faster and yields a smoother, creamier tari than the darker Kashmiri variety.
Lobia as a Complete Protein Diet
Red lobia is one of the most important plant-based protein sources available in South Asian cooking, and nutritionists consistently place it at the top of the list for vegetarians, semi-vegetarians, and anyone reducing meat consumption without wanting to reduce protein intake.
A single 100-gram serving of cooked red lobia contains 8 to 9 grams of protein, and when eaten with rice as is traditional in lobia chawal, the amino acid profiles of the two foods complement each other to form what nutritionists call a complete protein.
Rice is low in lysine but high in methionine. Red lobia is high in lysine but low in methionine. Together, eaten in the same meal, they supply all nine essential amino acids that the human body cannot manufacture itself. This is the nutritional logic behind one of the oldest food combinations in South Asian cooking.
Beyond protein, red lobia provides substantial dietary fibre at 6 to 7 grams per 100-gram serving, which slows digestion and keeps blood sugar stable after eating. It is rich in iron at 2.9 milligrams per 100 grams, folate essential for cell health and DNA repair, potassium for heart and blood pressure management, magnesium for muscle and nerve function, and complex carbohydrates that provide sustained energy without the spike and crash of refined grains.
The glycaemic index of red lobia is among the lowest of any common food at around 24, meaning it raises blood sugar very slowly, making it an excellent choice for people managing diabetes or insulin resistance.
Nutritionists recommend red lobia at least twice a week as part of a balanced diet. For active adults, growing children, pregnant women who have received clearance from their doctor, and anyone on a weight management programme, lobia chawal is not just comfort food. It is one of the most nutritionally complete and affordable meals a home kitchen can produce.
Why This Recipe Works Better Than Others
Grated Onion and Tomato Instead of Chopped Creates a Smoother, Thicker Tari
Most home lobia recipes use chopped onion and chopped tomato, which produce a masala with visible pieces even after long cooking. Chef Kunal Kapur uses grated or pureed onion and grated or pureed tomato throughout this recipe. Grated onion breaks down into the oil completely during frying, producing a smooth, uniform base rather than a textured one. Grated tomato, similarly, becomes part of the masala rather than sitting in identifiable pieces. The finished tari from a grated onion-tomato masala is noticeably thicker, smoother, and more coating than one made from chopped vegetables. This is the technique used in the best dhabas and home kitchens of Punjab and it is the primary reason this red lobia looks and tastes different from the many versions made with roughly chopped onion and tomato.
The Lobia Is Cooked in the Masala Before Water Is Added
After the masala reaches oil separation, the soaked and drained lobia goes into the pan raw with no water. It cooks in the masala for ten to twelve minutes, stirring regularly. During this time, the outer surface of each bean absorbs the spiced oil and masala and begins to cook in the fat. When the water goes in after this dry masala stage, the beans are already spice-coated and partially cooked from the outside in. The resulting tari is thick and clingy because the starch that cooks off the outer surface of the beans during the dry masala stage thickens the cooking liquid from the inside rather than being diluted by water from the start. Recipes that add water immediately after the masala produce a thinner, less coating tari.
Black Cardamom in the Oil at the Very Beginning Sets the Aromatic Base
Black cardamom, badi elaichi, has a smoky, slightly camphor-like fragrance that is entirely different from green cardamom. When it goes into hot oil at the beginning of the cooking process alongside the bay leaf and cumin, it releases its oils into the fat and that smoke-infused fat then carries the black cardamom character through every subsequent ingredient cooked in it. The onion fries in it, the tomato cooks in it, the lobia absorbs it. By the end of the cooking process, no individual spice is identifiable but the combined aroma is warm, deep, and distinctly Punjabi. Recipes that skip the black cardamom or add it as a powder later in the cooking produce a red lobia that is flavourful but lacks this smoky undertone.
Kashmiri Red Chilli Is Used for Colour, Not for Heat
This recipe uses one full tablespoon of Kashmiri red chilli powder. Kashmiri chilli is a mild variety with a brilliant red pigment and a fruity, almost sweet flavour profile. It gives the tari its characteristic deep red-orange colour without making the dish excessively hot. Using regular red chilli powder in the same quantity would produce a lobia that is uncomfortably spicy for most people, particularly children. The correct substitution if Kashmiri chilli is unavailable is half the quantity of regular red chilli powder combined with a teaspoon of sweet paprika to maintain both the flavour balance and the colour. This distinction matters because the visual appearance of red lobia, its deep rich colour, is part of what makes it as appealing as it tastes.
Kasuri Methi and Garam Masala Are Added at the Very End
Both kasuri methi and garam masala are added after the pressure cooking is complete and the tari has been brought to a final simmer. This timing is deliberate. Both ingredients contain volatile aromatic compounds that dissipate quickly in heat. Added at the beginning of a long cooking process, they would be undetectable by the time the dish reached the table. Added in the last five minutes of simmering, they retain their fragrance and contribute clearly to the finished flavour. Kasuri methi, crushed between the palms, adds a slightly bitter herbal quality that lifts the richness of the tari. Garam masala adds warmth and complexity to the final layer of the dish. Together, in the right quantity added at the right time, they are the signature finishing note of a properly made Punjabi red lobia.
prep time
15 min
Soak time
12h
cook time
1h 15m
servings
4
Ingredients
- Lobia1.25 cup
washed and soaked overnight
- Oil0.3 cup
- Bay leaf1 piece
- Black cardamom1 pods
badi elaichi
- Cumin seeds2 tsp
Method
Soak the Rajma and Prepare All Ingredients
Place the lobia in a large bowl and wash them several times until the water runs clear. Cover with plenty of cold water, at least three times the volume of the beans, and leave to soak overnight or for a minimum of four hours.
The beans will roughly double in size during soaking. When ready to cook, drain the soaked lobia completely through a colander and rinse once more under cold running water. Set aside.
While the lobia drains, grate the onions and tomatoes or pulse them separately in a small blender to a smooth puree.
The onion and tomato should be completely smooth with no large visible pieces. Prepare the ginger paste and garlic paste, chop the green chilli, and measure all spices into a small bowl so they are ready to add together in one go when the time comes.
Chef's Tip:
The soaking water for the lobia should always be discarded and fresh water used for cooking. The soaking water contains oligosaccharides, the complex sugars in legumes that are responsible for digestive discomfort after eating beans. Discarding the soaking water and using fresh water for cooking significantly reduces this effect without affecting the flavour of the finished dish. For maximum digestive ease, some cooks change the soaking water once during the overnight soak.
Build the Masala to Oil Separation
Heat one third cup of oil in a heavy-bottomed pan or pressure cooker base over medium heat.
Add the bay leaf, black cardamom pod, and cumin seeds together. Let them sizzle in the hot oil for thirty to forty-five seconds.
The cumin will crackle and darken slightly and the black cardamom will begin to swell and release its smoky fragrance. The whole kitchen will smell different within a minute of the spices going in.
Add the grated onion puree. It will sizzle loudly and release a significant amount of steam as the water from the onion hits the hot oil.
Stir continuously on medium heat for seven to eight minutes until the onion loses its raw smell, most of the moisture evaporates, and the mass turns a light golden brown colour.
The onion must reach this light golden stage before anything else is added. An undercooked onion base produces a sharp, slightly raw taste that carries through the entire finished dish regardless of how long the lobia cooks afterwards.
Add the chopped green chilli, ginger paste, and garlic paste. Fry for three minutes on medium heat, stirring continuously, until the paste turns golden and the raw garlic smell disappears.
Add the turmeric, Kashmiri red chilli powder, and coriander powder all together. Stir for thirty seconds to one minute to bloom the spices in the oil. Add the grated tomato puree and some salt.
Cook on medium heat for ten to twelve minutes, pressing and stirring regularly, until the tomatoes cook down completely and the oil separates clearly from the masala around the edges of the pan. This oil separation is the only reliable checkpoint that the masala is fully cooked and ready.
Chef's Tip:
Chef Kunal Kapur says in the recipe that the more nicely the masalas are cooked, the thicker and more coating the lobia tari will be. This is the single most important principle in this recipe. Every minute of extra patience at the masala stage pays off in the finished tari. If the tomatoes have not fully broken down and the oil has not clearly separated before the lobia goes in, the tari will be thin, slightly raw-tasting, and will not have the glossy, coating quality that makes a proper Punjabi lobia what it is.
Add the Lobia to the Masala and Cook Dry
Add the drained soaked lobia to the fully cooked masala in the pan. Increase the heat to medium-high.
Stir the lobia through the masala so every bean is coated in the spiced oil. Cook on medium-high heat for ten to twelve minutes, stirring regularly, without adding any water. During this time the beans will begin to absorb the masala and some of the surface starch will cook off into the pan, which will begin to look dry and slightly sticky. This is what you want.
The dry masala stage is what gives the finished tari its thickness and its ability to coat and cling to the rice.
When the masala begins to stick to the bottom of the pan and the lobia looks fully coated and slightly dry, the water stage begins. This sticky bottom is the signal Chef Kunal Kapur specifically mentions: it tells you the dry masala stage is complete.
Chef's Tip:
If the masala sticks to the bottom of the pan too quickly during the dry cook stage, reduce the heat slightly and add one tablespoon of water to deglaze, scraping the bottom with a spoon. Then continue on medium heat. The goal is to cook the lobia in the masala without burning the base. A small splash of water prevents burning without compromising the dry masala technique.
Add Water and Pressure Cook
Add approximately five cups of water to the pan with the masala-coated lobia. Stir well to deglaze any masala from the bottom of the pan and to ensure the lobia is evenly distributed in the liquid.
If cooking in a pressure cooker, secure the lid and cook on high heat to three whistles.
Turn off the heat after the third whistle and let the pressure release naturally for ten to fifteen minutes without opening the lid.
The natural release continues cooking the lobia gently in the residual steam and produces a significantly more tender bean than a forced quick release.
If cooking in a regular pot without a pressure cooker, bring the water to a full boil, then reduce the heat, cover tightly, and cook for forty-five minutes to one hour, checking every fifteen minutes and adding hot water as needed to keep the beans submerged.
The lobia is done when each bean is completely soft and can be easily mashed between two fingers with no resistance at the centre.
Chef's Tip:
After the pressure releases naturally and you open the cooker, the lobia should be sitting in a thick, dark, fragrant tari. If the tari looks too thin and watery at this point, do not worry. Transfer everything to a wide open pan and simmer uncovered on medium heat for five to ten minutes, stirring occasionally. The tari will thicken quickly as the liquid reduces and the starch from the beans concentrates the liquid further. Never try to correct a thin tari by adding flour or cornstarch. Time and heat are the only correctors needed.
Adjust Consistency, Finish and Serve
After the pressure releases, open the cooker and check the consistency of the tari.
If it is too thick, add a small amount of hot water and stir through. If it is too thin, transfer to a wide pan and simmer uncovered until it reduces to the right thickness.
The correct consistency is described as tari in Punjabi cooking: thick enough to coat the back of a spoon, glossy, and deep red-orange from the Kashmiri chilli and cooked tomato. It should flow slowly off the spoon rather than dripping quickly like water or sitting in a thick paste.
Bring the lobia to a gentle boil. Add the kasuri methi powder and garam masala. Stir through and simmer for five minutes.
Taste and check the salt. Adjust if needed. Turn off the flame. Serve over steamed basmati rice. Add a small knob of ghee on top of the rice if desired: this is how it is traditionally finished at the Punjabi table and it is the final thing that takes the dish from very good to genuinely memorable.
Garnish with fresh coriander leaves and serve immediately.
Chef's Tip:
Lobia tastes noticeably better the next day. The spices continue to develop overnight in the fridge and the tari deepens in colour and flavour. If you are cooking for a gatherin or a weekend lunch, make the lobia the evening before and reheat gently the next day with a small splash of hot water to loosen the tari. Add the kasuri methi and garam masala only during the final reheating, not the night before, so their fragrance stays bright at serving time.
Why This Recipe Needs No Changes
Lobia does not need innovation. The dish has been made the same way in Punjabi homes for generations and those generations got it right. The grated onion and grated tomato are not a convenience shortcut. They are the technique. The dry masala stage before the water goes in is not an optional extra step. It is the reason the tari is thick. The soaking overnight is not about convenience. It is about the bean.
Every modification that home cooks commonly make to speed up this recipe, adding onion in large pieces, skipping the dry masala stage, using canned tomatoes, adding water at the start, reduces the quality of the finished dish by a visible and tasteable degree. The recipe is not difficult. It is simply honest about the time it needs. Give it the time and it gives back a plate of lobia that tastes like it was made by someone who has been making it their whole life, because someone who made it their whole life is exactly who this recipe came from.
Nutritions
Per serving (~250 g)
People Also Ask
Yes, though the result is noticeably different from dried lobia soaked and cooked from scratch. Canned beans are already fully cooked and do not benefit from the dry masala stage in the same way because they are too soft to absorb the masala over ten to twelve minutes without beginning to break apart. If using canned lobia, make the full masala to oil separation, add the drained and rinsed canned beans with only two cups of water rather than five, simmer covered for fifteen minutes rather than pressure cooking, and add the kasuri methi and garam masala to finish. The tari will be thinner and the flavour will be less deep than the dried version but it is a workable weeknight shortcut when time is limited.
Yes. Use a heavy-bottomed pot with a tight-fitting lid. After adding the five cups of water to the masala-coated lobia, bring to a full boil over high heat. Reduce to medium-low, cover tightly, and cook for forty-five minutes to one hour, checking every fifteen minutes. If the water reduces below the level of the beans before they are fully tender, add more hot water. The lobia is ready when each bean can be mashed easily between two fingers with no hard centre remaining. The finished tari may be slightly thinner than the pressure cooker version because the longer stovetop cook evaporates more water. Simmer uncovered at the end to reduce to the right consistency.
There are two reliable signs that the masala is fully cooked and ready for the lobia. The first is oil separation: a ring of clear oil visibly pulling away from the tomato and onion mass around the edges of the pan. The second is the smell: the raw, sharp smell of tomato and ginger garlic disappears and is replaced by a warm, rounded, unified fragrance. Both signs should be present before the lobia goes in. If only one is present, give the masala another two to three minutes and check again. A masala that smells raw will produce a lobia that tastes raw regardless of how long the beans cook.
Hard lobia after cooking is almost always caused by one of three things. The most common is insufficient soaking time: four hours is the absolute minimum and overnight is strongly preferred. Beans that are under-soaked do not rehydrate fully and remain hard at the centre even after extended cooking. The second cause is old beans. Lobia that has been stored for more than a year can have dehydrated to the point where even overnight soaking does not fully rehydrate them. If your lobia is from an old batch, replace it. The third cause is adding salt too early in the pressure cooker stage. Salt toughens the skin of legumes during cooking. Add salt to the masala during building but not to the water before pressure cooking. Check salt only after the beans are fully tender.